Mywifiext.net Login
Mywifiext.net serves as the web-based administrative panel for NETGEAR range extenders. It enables users to log in and modify WiFi passwords, SSID, and default settings at http://mywifiext.net.
Mywifiext.net
Mywifiext.net serves as the web-based administrative panel for NETGEAR range extenders. You can utilize it to log in and modify your WiFi password, SSID, and default settings by accessing http://mywifiext.net.
How to setup Mywifiext.net?
To set up your NETGEAR extender, follow these steps:
- Connect to the default WiFi Network (SSID) “NETGEAR_EXT.” The password is either “password” or no password.
- Open a web browser and type “mywifiext.net” in the address bar.
- Click on “NEW EXTENDER SETUP.”
- Create an Account by providing your Email, Password, and Security Question, then click “NEXT.”
- When prompted with “Your WiFi extender is not connected to the router,” click “YES.”
- Choose the existing WiFi network you want to extend. If you prefer not to extend both 2.4GHz and 5GHz WiFi Networks, you can deselect the WiFi band and click “NEXT.”
- Enter the password (network key) for your existing 2.4GHz and 5GHz WiFi Networks, and click “NEXT.”
- Provide a Network Name (SSID) for your Extended WiFi Network(s).
- For the Extended Network WiFi Password, you have three options: “Same as existing network password,” “Use a different password,” or “None.” Select your preference and click “NEXT.”
- Connect to your Extended Network and click the “CONTINUE” button to complete the setup.
We're here to help! Call Us Today!
Mywifiext.net Login - Netgear Extender Setup
To set up your Netgear extender and log in to mywifiext.net, just follow these steps:
- Connect your computer or mobile device to the Netgear extender’s network.
- Open a web browser and enter “mywifiext.net” in the address bar. If the website doesn’t load, you can try accessing it using the Netgear extender’s IP address (usually 192.168.1.250).
- You’ll be redirected to the Netgear extender login page. Enter your username and password (default username is “admin,” default password is “password”). If you’ve changed the login details previously, use the updated ones.
- Click on the “New Extender Setup” button to begin configuring your Netgear extender.
- Follow the on-screen instructions to complete the setup process.
To finalize the setup procedure, follow the directions displayed on the screen.
Important Note: For a successful Netgear WiFi extender setup, it is crucial to position the extender close to your router to ensure a stable connection. Before commencing the setup process, ensure you have access to your router’s login credentials, including the username and password. Additionally, verify that your internet connection is functioning smoothly.
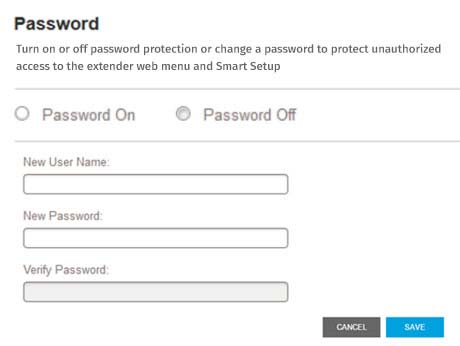
Change Username and Password using mywifiext
To modify your username and password using mywifiext, you can proceed with the steps outlined below:
- Ensure your computer or mobile device is connected to your Wi-Fi network.
- Launch a web browser and navigate to the mywifiext website.
- Log in by providing your current username and password.
- Click on the “Settings” option.
- Choose either “Change Password” or “Change Username,” depending on your specific requirement.
- Follow the on-screen instructions to input your new desired username or password.
- Save the changes by clicking the “Save” button.
After saving the changes, you will need to reconnect your devices to the Wi-Fi network using the updated username and password.
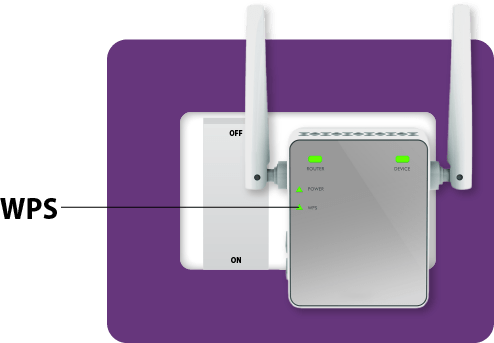
Netgear Wifi Extender Setup Using WPS Button
Setting up a Netgear WiFi extender using the WPS (Wi-Fi Protected Setup) button is a quick and easy method. Here are the steps to do it:
- Position your Netgear WiFi extender in a location where it can receive a strong sig
- Plug the Netgear WiFi extender into a power outlet and wait for the power LED to become stable.
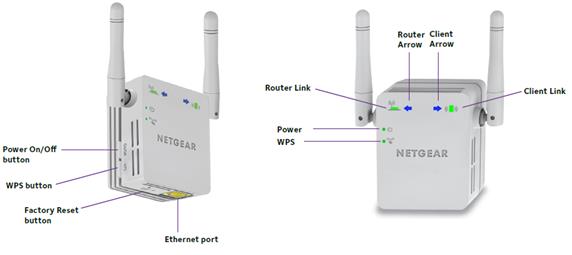
- Locate the WPS button on your Netgear extender. It is usually on the side or the front panel of the device.
- Press and hold the WPS button on the extender for about 5 seconds. The WPS LED on the extender should start blinking.
- Within 2 minutes of pressing the WPS button on the extender, press the WPS button on your main router. This action will initiate the WPS connection process.
- The WPS LED on both the extender and the router will blink for a short time as they establish a connection. Once the connection is established, the WPS LED on both devices should become solid.
- If the extender’s WPS LED is solid, you can now unplug the extender and move it to a location with better WiFi coverage. Make sure it’s still within the range of your main router.
- You can now connect your devices (such as laptops, smartphones, etc.) to the extended WiFi network. Look for the new WiFi network name (SSID) on your devices and use the same WiFi password as your main router.
Your Netgear WiFi extender is now set up and extending the range of your existing WiFi network using the WPS button method.
Netgear Wifi Extender reset
Reset using the Reset Button on the Extender
- Locate the Reset button on your Netgear WiFi extender. The position of the Reset button may vary based on the model of your extender, but it is usually found on the side or back of the device.
- Use a small, pointed object like a paperclip or pin to press and hold the Reset button for about 5 to 10 seconds.
- Release the Reset button once the power LED on the extender blinks. This indicates that the reset process has begun.
- Wait for the extender to reboot. The power LED will stabilize and the extender will be reset to its factory default settings.
Reset using the Web Interface (mywifiext)
- Connect your computer or mobile device to your Netgear WiFi extender’s network (usually named “NETGEAR_EXT”).
- Open a web browser and go to the mywifiext website (http://www.mywifiext.net or http://mywifiext.com).
- Log in to the web interface using your extender’s username and password.
- Once logged in, navigate to the “Maintenance” or “Settings” section of the web interface.
- Look for an option similar to “Reset” or “Restore to Factory Settings.”
- Click on the “Reset” or “Restore” button to initiate the reset process.
- Confirm the action when prompted. The extender will reset, and the process may take a few moments.
- After the reset, the extender will reboot and return to its factory default settings.
Please note that resetting your Netgear WiFi extender will remove any custom configurations and settings you have made. After the reset, you’ll need to set up the extender again using the setup process explained in the user manual or using the WPS method if your extender supports it.
Mywifiext.net not working
I apologize to hear that you are experiencing issues with mywifiext.net. If mywifiext.net is not working for you, there could be several reasons behind it. Let’s go through some troubleshooting steps to try and resolve the problem:
- Check the Internet Connection: Ensure that your computer or device is properly connected to the internet. Try opening other websites to see if they load correctly. If not, there might be a problem with your internet connection.
- Clear Browser Cache: Sometimes, cached data in your web browser can cause issues. Try clearing your browser’s cache, cookies, and history, and then attempt to access mywifiext.net again.
- Use a Different Browser: Sometimes, certain browsers may have compatibility issues with specific websites. Try using a different web browser, such as Chrome, Firefox, or Edge, to see if mywifiext.net works in another browser.
- Verify the URL: Make sure you are entering the correct URL for mywifiext.net. Double-check for any typos or errors in the address.
- Restart Devices: If possible, restart your router, modem, and the device you are using to access mywifiext.net. This can sometimes resolve connectivity issues.
- Use IP Address: Instead of using mywifiext.net, try accessing your extender’s setup page using its IP address. You can find the IP address in the extender’s documentation or by checking your network settings.
- Disable Firewall or Antivirus: Temporarily disable any firewall or antivirus software you have running, as they may be blocking access to mywifiext.net.
- Connect via Ethernet: If you are trying to set up a Wi-Fi range extender, try connecting your computer to the extender using an Ethernet cable during the setup process.
- Reset the Extender: As a last resort, you can perform a factory reset on your Wi-Fi extender. Be aware that this will erase any existing settings, and you will need to set it up again from scratch.
If you’ve gone through these steps and mywifiext.net is still not working, there may be other underlying issues that require technical support from the manufacturer or your internet service provider. In that case, you should contact their support teams for further assistance.
Mywifiext.net smart wizard
The web address mywifiext.net serves as a platform to set up and configure Netgear WiFi extenders. This address features a smart wizard that guides users through the setup process step by step. Below are detailed instructions on how to use the smart wizard of mywifiext.net:
- Begin by connecting your Netgear WiFi range extender to your computer either via an Ethernet cable or wirelessly.
- Next, launch a web browser and type mywifiext.net into the address bar. Press Enter or click Go.
- The login page will appear, prompting you to enter your username and password. The default login credentials are ‘admin’ for the username and ‘password’ for the password, providing easy access to the system.
- Once logged in, the setup wizard, also known as the smart wizard, will appear. It will guide you through the entire configuration process for your Netgear WiFi range extender.
- Use the wireless network manager to select the WiFi network that you wish to extend. Enter the WiFi password when prompted and then click Continue.
- At this stage, you can choose a network name and password for your Netgear WiFi range extender. Additionally, you have the option to select the network security protocol, such as WEP, WPA, WPA2, etc.
- Review all the settings you have selected, and when you are satisfied, click on the Finish button to save the changes.
- Once the setup process is complete, disconnect your Netgear WiFi range extender from the computer and place it in your desired location.
- Now, connect your devices to the extender’s network, and you can enjoy the extended WiFi coverage provided by your Netgear WiFi range extender.
Note: If you encounter any issues during the setup process, you have the option to reset your Netgear WiFi range extender to its factory default settings. Afterward, you can start the configuration process again from the beginning.
Mywifiext.net Troubleshooting Tips
If you encounter difficulties while setting up or accessing mywifiext.net, here are some troubleshooting tips to help resolve the issue:
- Verify that your Wi-Fi network is functioning correctly and providing adequate internet speed.
- Double-check that your computer, laptop, or mobile device is connected to the same wireless network as your Wi-Fi range extender.
- Ensure your web browser is up-to-date and free from any add-ons or plug-ins that might interfere with mywifiext.net.
- Attempt to access mywifiext.net using a different web browser or device to rule out any local problems.
- Restart your router, modem, and range extender by unplugging them from the power source for a few seconds and then plugging them back in.
- Confirm that your range extender is positioned within the range of your existing Wi-Fi network.
- If the issue persists, consider resetting the range extender to its factory default settings and then reconfigure it from the beginning.
- Should none of the above solutions prove effective, reach out to the support team of your range extender’s manufacturer for further assistance.
Frequently Asked Questions (FAQs)
What is mywifiext.net?
Mywifiext.net is a web-based setup portal specifically designed for NETGEAR WiFi extenders, allowing users to configure, monitor, and troubleshoot their extenders conveniently.
Is mywifiext.net compatible with all WiFi extenders?
Mywifiext.net supports a wide range of NETGEAR WiFi extenders, ensuring compatibility with various models.
Can I access advanced settings through mywifiext.net?
Yes, mywifiext.net provides access to advanced settings for users who prefer personalized configurations.
Why is my WiFi extender not connecting to the router?
Ensure the extender is powered on and positioned within the router’s range. Double-check that you followed the setup process correctly.
How do i update my Netgear Extender Firmware?
You can update the firmware of your Netgear extender by logging into the Netgear Genie app or web interface and checking for any available updates. Make sure to attentively follow the directions and not stop the firmware update procedure.